Think others will like this? Share it!
Hello, fellow food enthusiasts! I’m thrilled to share with you a delightful journey that led to the discovery of an incredible Fantasy Fudge Recipe. This journey isn’t just about the recipe; it’s a tale of friendship, nostalgia, and the magic of cooking.
Several years ago, I embarked on a culinary adventure with my neighbor, Emily. We both shared a passion for exploring unique recipes and often exchanged our favorite finds. One chilly December evening, as we sipped hot cocoa by the fireplace, Emily reminisced about a Fantasy Fudge recipe her grandmother used to make. She described it as a creamy, chocolatey delight, with the perfect balance of sweetness and texture. Intrigued, I knew we had to recreate this family treasure.
After scouring old cookbooks and making a few tweaks to modernize the recipe, we finally perfected it. The result was a mouth-watering fudge that was both rich in flavor and history. This Fantasy Fudge recipe quickly became a favorite among friends and family, and now, I’m excited to share it with you!
The Origin of Fantasy Fudge
Click here to get printable version
When we talk about Fantasy Fudge, we’re delving into more than just a recipe; we’re exploring a piece of culinary history that has delighted taste buds for generations. The story of Fantasy Fudge is not just about its scrumptious, melt-in-your-mouth quality, but also about how this delightful treat has become a staple in kitchens around the world.
Fudge, in its broadest sense, is a type of confectionery which is usually very sweet, extremely rich, and made from sugar, butter, and milk or cream. The exact origins of fudge are somewhat disputed, but it’s widely believed that it was accidentally created in the United States in the late 19th century. The term ‘fudge’ is thought to have come from the phrase ‘oh fudge!’, which was an exclamation of frustration at batch of candy (likely caramel) that had been inadvertently ‘fudged’ or messed up. From this happy accident, the delicious treat we know as fudge was born.
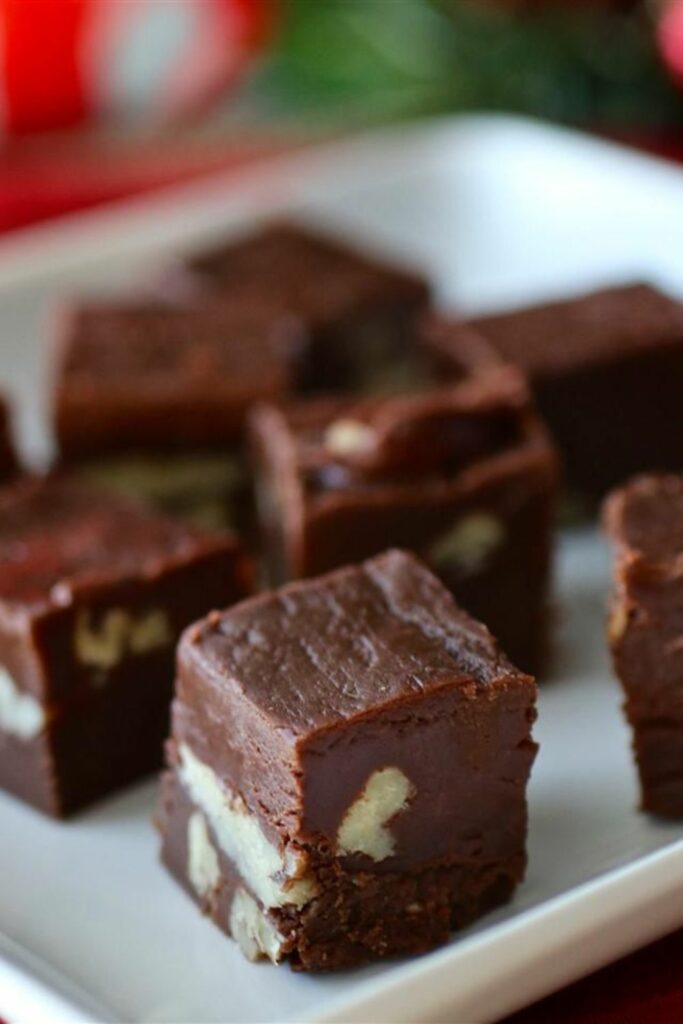
Fantasy Fudge, in particular, takes this traditional confection to new heights. It’s a variant that emerged in the mid-20th century and quickly gained popularity due to its creamy texture and rich chocolate flavor. What sets Fantasy Fudge apart from traditional fudge is the addition of marshmallow cream. This ingredient not only enhances the fudge’s texture, making it smoother and creamier, but also adds a unique flavor profile that distinguishes it from its counterparts.
The recipe for Fantasy Fudge became widely accessible in the 1960s, thanks to its inclusion on the back of the Marshmallow Fluff jar and later, the Kraft Jet-Puffed Marshmallow Creme jar. This accessibility contributed to its popularity, as home cooks across America and beyond began to try their hand at this delightful treat. The recipe was simple enough for even novice confectioners to master, yet the results were consistently delicious, making it a go-to recipe for holiday treats, family gatherings, and homemade gifts.
Over the years, Fantasy Fudge has not only remained a beloved recipe but has also evolved. Home cooks and professional chefs alike have experimented with the recipe, adding various nuts, flavorings like vanilla or bourbon, and even alternative types of chocolate. This versatility ensures that Fantasy Fudge is not just a relic of the past but a living, evolving recipe that continues to bring joy to new generations.
How to Prepare Fantasy Fudge Recipe
Ingredients:
- Granulated Sugar: 3 cups
- Unsalted Butter: ¾ cup (cut into small pieces for even melting)
- Evaporated Milk: ⅔ cup (use full-fat for richer taste)
- Semi-Sweet Chocolate Chips: 12 ounces (quality chocolate recommended for best flavor)
- Marshmallow Cream: 7 ounces (ensure it’s fresh for smooth texture)
- Chopped Walnuts: 1 cup (optional, can be substituted with pecans or omitted)
- Pure Vanilla Extract: 1 teaspoon (use pure extract for best flavor)
Detailed Step by Step Directions:
- Preparation: Line a 9×13 inch baking pan with aluminum foil, ensuring enough overhang on the sides for easy removal. Lightly grease the foil with butter or a non-stick spray.
- Sugar Mixture: In a large, heavy saucepan, combine 3 cups of granulated sugar, ¾ cup of unsalted butter, and ⅔ cup of evaporated milk. The butter should be cut into small pieces for uniform melting.
- Cooking the Mixture: Place the saucepan over medium heat. Stir the mixture constantly with a wooden spoon or heat-resistant spatula to prevent burning. Bring the mixture to a full rolling boil (a boil that doesn’t stop bubbling when stirred).
- Boiling: Once boiling, continue to cook for exactly 5 minutes, stirring constantly. This is crucial for achieving the right consistency. If using a candy thermometer, the temperature should reach between 234°F to 240°F (soft-ball stage).
- Adding Chocolate: Remove the saucepan from the heat. Immediately add 12 ounces of semi-sweet chocolate chips. Stir vigorously until the chocolate is completely melted and the mixture is homogenous.
- Incorporating Marshmallow and Vanilla: Quickly stir in 7 ounces of marshmallow cream and 1 teaspoon of pure vanilla extract. Mix until well combined and smooth.
- Adding Nuts (Optional): If using nuts, fold in 1 cup of chopped walnuts at this stage, ensuring they are evenly distributed throughout the mixture.
- Setting the Fudge: Pour the fudge mixture into the prepared pan, spreading it evenly with a spatula. Tap the pan gently on the counter to remove any air bubbles.
- Cooling: Allow the fudge to cool at room temperature until it is firm, which typically takes about 4 hours. Avoid speeding up the process in the refrigerator, as this can affect the texture.
- Cutting the Fudge: Once set, use the foil overhang to lift the fudge out of the pan. Place it on a cutting board. Using a sharp knife, cut the fudge into squares. For cleaner cuts, heat the knife in warm water and dry it before each cut.
- Storage: Store the fudge in an airtight container at room temperature for up to 2 weeks. For longer storage, refrigerate or freeze as described in the FAQ section.
Frequently Asked Questions
Can I Make Fantasy Fudge Without Nuts?
Yes, nuts are optional in this recipe. You can easily omit them if you prefer your fudge nut-free or are catering to allergies.
How Long Does Fantasy Fudge Last?
Properly stored in an airtight container, Fantasy Fudge can last up to 2 weeks at room temperature. For longer storage, you can refrigerate it.
Can I Use Different Types of Chocolate?
Absolutely! While semi-sweet chocolate chips are traditional, feel free to experiment with milk chocolate or dark chocolate for different flavor profiles.
Is It Necessary to Use a Candy Thermometer?
While not necessary, a candy thermometer can be helpful to ensure the sugar mixture reaches the correct temperature. A full rolling boil for 5 minutes is usually sufficient.
Can I Freeze Fantasy Fudge?
Yes, Fantasy Fudge freezes well. Wrap it tightly in plastic wrap and store it in an airtight container. It can be frozen for up to 3 months.
What’s the Best Way to Cut Fudge?
For clean cuts, use a sharp knife and wipe it clean after each cut. If the fudge is very firm, warming the knife in hot water can help.
Can I Make Fantasy Fudge in a Microwave?
While stovetop preparation is generally recommended for achieving the best consistency, it’s certainly possible to make Fantasy Fudge using a microwave. Firstly, you should gather all your ingredients just as you would for the stovetop method. Then, cautiously melt the ingredients in the microwave, taking care to do this in short bursts. This approach helps in preventing the chocolate from overheating, which can be a common issue when using a microwave. Additionally, it’s important to stir the mixture frequently, ensuring that the ingredients are evenly heated and well combined. Ultimately, while the microwave method can be a quicker alternative, paying close attention to the process is key to making perfect Fantasy Fudge.
How Can I Prevent the Fudge from Being Too Soft?
Ensure you boil the sugar mixture for a full 5 minutes and let the fudge set completely at room temperature. This helps achieve the right consistency.
Can I Substitute Marshmallow Cream with Marshmallows?
Marshmallow cream is recommended for its smooth texture. However, in a pinch, you can use marshmallows. About 4 cups of mini marshmallows can substitute for 7 oz of marshmallow cream.
Is Fantasy Fudge Gluten-Free?
This recipe can indeed be gluten-free, provided that all the ingredients used are certified gluten-free. This is particularly important for key components like the chocolate chips and marshmallow cream. Firstly, ensure that the chocolate chips you select bear a gluten-free label. Similarly, carefully check the marshmallow cream for the same certification. By doing so, you can confidently enjoy this delightful treat without any gluten-related concerns. Ultimately, with these careful selections, everyone can savor the rich and creamy taste of Fantasy Fudge, regardless of dietary restrictions.
Fantasy Fudge (Original Recipe)
Ingredients
- 3 cups of granulated sugar
- ¾ cup of unsalted butter
- ⅔ cup of evaporated milk
- 12 oz of semi-sweet chocolate chips
- 7 oz of marshmallow cream
- 1 cup of chopped walnuts optional
- 1 teaspoon of pure vanilla extract
Instructions
- Begin by lining a 9x13 inch baking pan with foil and lightly greasing it with butter. This will make removing the fudge easier.
- In a heavy saucepan, combine the sugar, butter, and evaporated milk. Bring this mixture to a full rolling boil over medium heat, stirring constantly to prevent burning.
- After boiling for 5 minutes, remove the saucepan from the heat. Stir in the chocolate chips until they are completely melted and the mixture is smooth.
- Next, fold in the marshmallow cream, vanilla extract, and chopped walnuts (if using). Stir well until everything is thoroughly combined.
- Pour the mixture into the prepared pan and spread it evenly. Let it cool at room temperature until set, which usually takes about 4 hours.
- Once set, lift the fudge out of the pan using the foil and cut it into squares. Store in an airtight container.