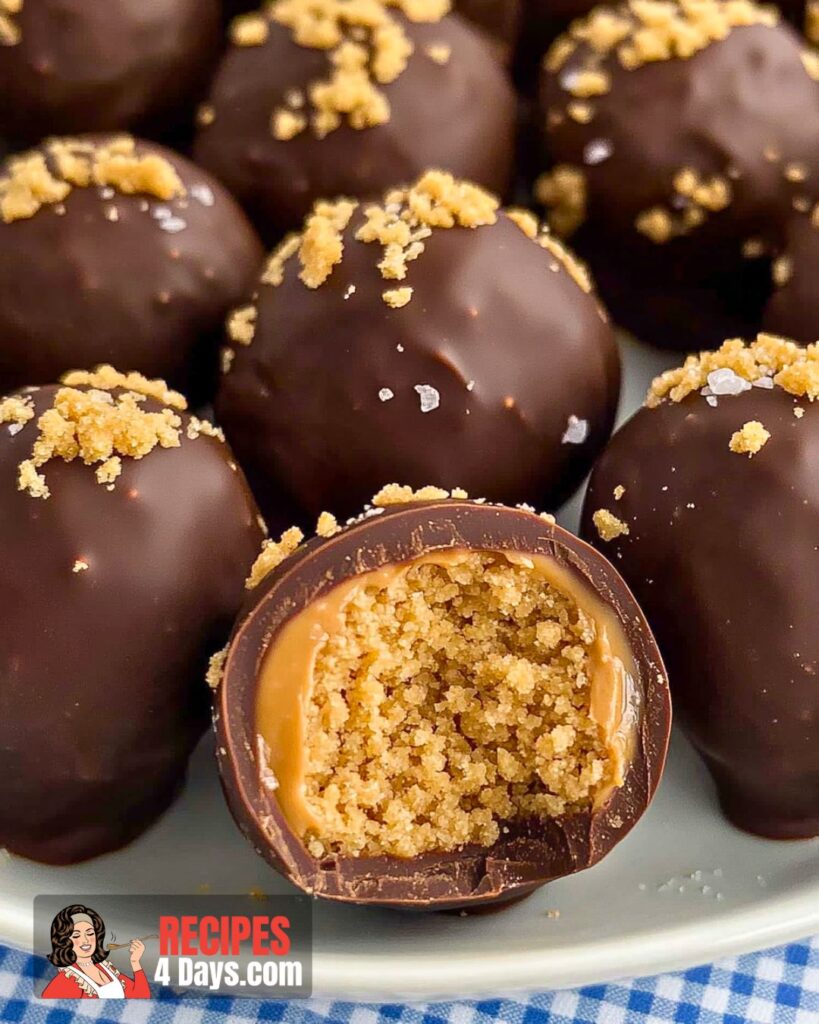
Do you know that feeling when you stumble upon a sweet treat that just melts everyone’s heart at the family gathering? Well, that’s exactly what happened when I whipped up these Butterfinger Balls for a get-together last weekend. Let me tell you, they didn’t last long! Every crunchy, creamy bite was savored, and in no time, they disappeared, leaving only crumbs and happy smiles.
You see, I’m always on the lookout for easy-to-make recipes that can cater to different tastes, especially those with a sweet tooth. These Butterfinger Balls are a no-bake wonder, which means no turning on the oven – perfect for busy weekends, right? Plus, the combination of peanut butter and chocolate is a match made in heaven; who can resist that?
What I love about this recipe is its simplicity. With just a handful of ingredients, you get to create these little bites of joy. And let’s not overlook the fun part – crushing the Butterfinger bars! There’s something satisfying about transforming whole bars into crispy bits that add the signature crunch to our treats.
If you’re like me and sometimes need a quick dessert that still feels a tad fancy, these Butterfinger Balls are your best bet. You get to make them ahead of time, and it’s a great way to engage the kids in the kitchen, too. After all, who wouldn’t enjoy rolling the mixture into balls and dipping them into melted chocolate?
So, whether you’re a mom looking to impress at the next school bake sale or just someone who’s craving a delightful homemade dessert, give this recipe a try. I guarantee you’ll turn into the favorite hostess all thanks to these little indulgences. Ready to dive in? Let’s get started!
How to Make Butterfinger Balls
Click here to get printable version
Ingredients
- 1 cup smooth peanut butter
- 4 tablespoons softened butter
- 1 teaspoon vanilla extract
- 1 cup confectioners’ sugar
- ¾ cup crushed graham crackers
- ½ cup crushed Butterfinger bars
- 8 ounces chocolate chips or chocolate bark
- Optional: extra crushed Butterfingers, holiday sprinkles, or flaky sea salt for garnish
Directions
- In a medium bowl, blend the peanut butter with the softened butter using an electric mixer on medium. Keep mixing until the mixture becomes smooth and creamy.
- Add in the vanilla extract and mix again until it’s fully integrated with the peanut butter mix.
- Slowly introduce the confectioners’ sugar, mixing on low speed and scraping down the bowl as needed to ensure everything combines well.
- Gently fold in the crushed graham cracker crumbs along with the Butterfinger bits until evenly distributed throughout the mixture.
- Line a baking sheet with parchment paper. Roll the mixture into balls, about 1 to 1½ tablespoons each, and place them on the sheet.
- Place the sheet in the freezer for about 30 minutes to firm up the balls.
- Melt the chocolate in a microwave-safe bowl, using short bursts of 30 seconds at 50% power, stirring between each interval until smooth.
- Coat each chilled ball in the melted chocolate, either fully or partially, as you prefer, then sprinkle with extra Butterfinger crumbs, sprinkles, or sea salt.
- Allow the chocolate to set completely before serving. Enjoy your homemade Butterfinger Balls!
Storing Suggestion
To keep your Butterfinger Balls fresh, store them in an airtight container in the refrigerator. They’ll stay delightful for up to a week, making them a perfect make-ahead treat. If you plan to store for longer, consider freezing them, as this will keep them fresh for up to a month.
Cooking Tips
If you find peanut butter too sticky, try refrigerating it for a bit before mixing. Also, ensure the Butterfinger bars are well-crushed to get an even distribution. When melting chocolate, do it gently to avoid scorching; it’s best to stop microwaving while some lumps remain and stir them away.
Serving Suggestions
Present these Butterfinger Balls on a decorative platter with choice garnishes like sprinkles or sea salt to enhance their visual appeal. Pair them with a hot cup of coffee or a cold glass of milk to complement the rich flavors. Perfect for parties or cozy family nights.
Ingredient Substitutions
If you’re not keen on peanut butter, try almond butter for a different nutty flavor. Graham crackers can be swapped with digestive cookies for a similar texture. Use dark chocolate instead of milk chocolate for a richer taste, or go for white chocolate for a sweeter contrast.
Seasonal Variations
In the fall, consider adding a dash of cinnamon or nutmeg for a warm spice twist. For the holidays, mix in some crushed peppermint candy into the coating. In summer, serve with a chilled fruit salad on the side to add a fresh zing.
Allergen Information
This recipe contains peanuts and dairy. For those with nut allergies, substitute peanut butter with sunflower seed butter or soy butter. Use a dairy-free butter alternative and allergen-safe chocolate chips for a dairy-free version, ensuring all substitutions suit individual dietary needs.
FAQ
Can I make these Butterfinger Balls ahead of time?
Absolutely! These treats are great for making in advance. Simply prepare them as directed and store them in the refrigerator until you’re ready to serve. They’re perfect to have ready a day or two before a big event or party.
What if I don’t have an electric mixer?
No worries! You can mix the ingredients by hand using a sturdy spoon or spatula. Just make sure the butter is well-softened to make the mixing easier and ensure a creamy texture.
Can I freeze Butterfinger Balls?
Yes, you can freeze them. Place the balls in a single layer on a baking sheet, freeze until solid, then transfer to a freezer-safe container. They’ll keep well for up to a month, letting you enjoy them at any time.
What can I use to crush the Butterfinger bars?
Using a food processor is the quickest way to crush Butterfinger bars. If you don’t have one, putting the bars in a zip-top bag and crushing them with a rolling pin works just as well. Aim for small pieces for better texture.
How can I prevent the chocolate from seizing?
Be sure to avoid any moisture when melting chocolate. Use dry utensils and bowls. Microwave in short intervals and stir often to prevent overheating, stopping once it’s mostly melted and stirring to finish.
Why are my Butterfinger Balls not holding their shape?
If the mixture is too sticky, chill it for a brief period before rolling into balls. Also, ensure you measure the ingredients accurately and mix them thoroughly to get the right consistency.

Butterfinger Balls
Ingredients
- 1 cup smooth peanut butter avoid natural types
- 4 tablespoons softened butter equivalent to 1/2 stick
- 1 teaspoon vanilla extract
- 1 cup confectioners' sugar
- ¾ cup crushed graham crackers
- ½ cup crushed Butterfinger bars
- 8 ounces chocolate chips or chocolate bark
- Optional extra crushed Butterfingers for garnish, holiday sprinkles or flaky sea salt
Instructions
- In a medium-sized bowl, combine the peanut butter and softened butter. Using an electric mixer on medium speed, mix them until well blended.
- Next, pour in the vanilla extract and blend until everything is nicely combined.
- Gradually incorporate the powdered sugar, adding it in portions while mixing on low speed. Remember to scrape the sides of the bowl occasionally for even mixing.
- Gently fold in the crushed graham cracker crumbs and Butterfinger bits.
- Prepare a large cookie sheet by lining it with parchment paper. Take about 1 to 1½ tablespoons of the mixture and roll it into smooth balls. Place these on the baking sheet.
- Pop the baking sheet into the freezer for around 30 minutes to let the balls chill thoroughly.
- For the chocolate coating, melt the chocolate in a microwave-safe bowl using 30-second intervals at 50% power. Stir in between to ensure it melts evenly; don’t overheat it! Remove it while there are still some chunks and keep stirring until fully melted.
- Dip each chilled ball into the molten chocolate, either covering it completely or leaving a bit of the peanut butter mixture exposed for a fun visual.
- Finish them off by sprinkling more crushed Butterfingers, holiday sprinkles, or a touch of flaky sea salt on top. Let the chocolate harden completely, and then enjoy!
