Think others will like this? Share it!
There’s something truly magical about the smell of freshly baked bread, isn’t there? It takes me back to my grandmother’s cozy kitchen, where I first learned how to make Pampushky, the delightful Ukrainian garlic bread. These aromatic rolls have always been a staple at our family gatherings, adding a touch of warmth and tradition to the table. I remember sitting at the kitchen counter, watching the dough rise, and feeling the anticipation build as the yeasty aroma filled the room.
Pampushky are more than just bread; they’re a connection to my heritage and a reminder of simpler times. My mother always said that the secret to perfect Pampushky lies in the balance of flavors— the sweetness of the dough, the pungency of fresh garlic, and the hint of dill that ties it all together. Each time I bake them, I think of the laughter and stories shared over countless meals, and it makes me smile.
Whether you’re looking to bring a slice of Ukrainian culture to your table or simply want to indulge in something delicious, Pampushky won’t disappoint. They’re surprisingly easy to make, and trust me, your kitchen will smell divine. So grab your apron, warm up the oven, and let’s make some memories with these irresistible garlic rolls!
For those new to baking, don’t worry! With just a few simple ingredients like milk, eggs, and flour, you’ll be well on your way to mastering this beloved bread. And once you’ve tasted them, you’ll understand why Pampushky are a cherished part of our family traditions. So, what are you waiting for? Dive into this recipe and let the magic of freshly baked Pampushky transform your home into a haven of delightful aromas and heartwarming flavors.
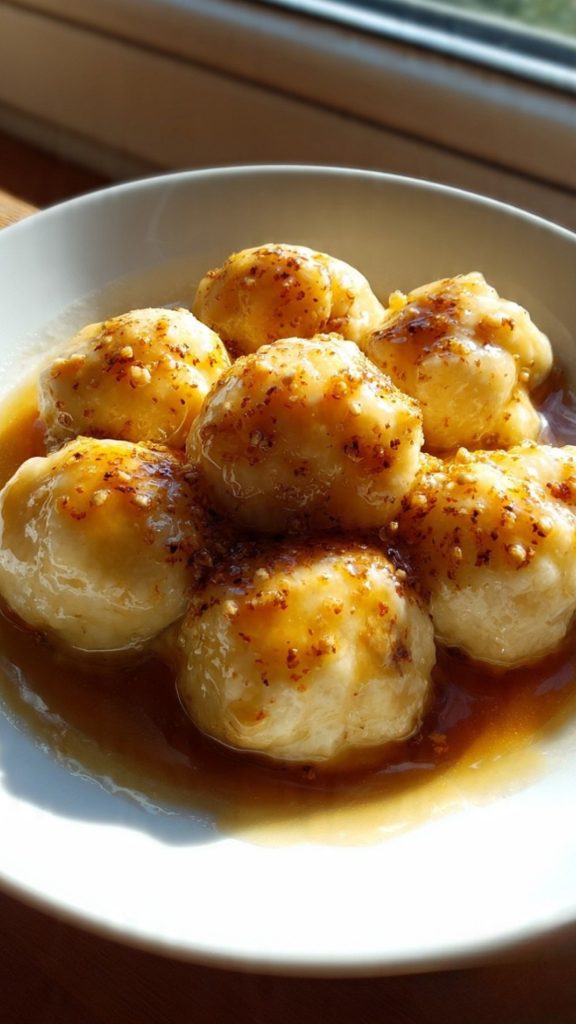
How to Make Ukrainian Garlic Bread – Pampushky
Click here to get printable version
Ingredients:
- 2 1/4 cups lukewarm milk
- 3 teaspoons sugar
- 1 tablespoon active dry yeast
- 2 large eggs
- 5 tablespoons olive or avocado oil
- 7 cups bread flour
- 1/2 tablespoon salt
- 1 egg (for brushing)
- 1 tablespoon water (for brushing)
- 1/4 cup olive or avocado oil
- 5 minced garlic cloves
- 1 tablespoon coarse sea salt
- 5 tablespoons fresh dill (chopped)
Directions:
- In a spacious mixing bowl, combine lukewarm milk, sugar, and yeast. Cover it with a towel and allow it to sit for about 10 minutes to activate the yeast.
- Stir in the eggs and 5 tablespoons of oil, blending until you achieve a smooth mixture.
- In a separate bowl, mix salt with the bread flour. Gradually incorporate this dry mixture into the wet ingredients, kneading until you have a smooth, elastic dough. Cover and let it rise for an hour.
- After the dough has risen, lightly oil a baking pan. Divide dough into 24 equal parts, rolling each into a ball. Arrange on the pan, spacing them an inch apart.
- Cover the balls with a towel, allowing them to rise again for about 30 minutes or until they double in size. Preheat the oven to 350°F during this time.
- In a small dish, whisk together an egg with water. Brush this over the dough balls and bake for 30 minutes, or until they turn golden brown.
- While baking, mix 1/4 cup oil, minced garlic, dill, and coarse sea salt in a separate bowl.
- Once out of the oven, brush the warm pampushky with the garlic mixture. Enjoy them warm!
Flexible Ingredient Options for Every Cook
If you don’t have bread flour, all-purpose flour can be a handy substitute, though the texture might be less chewy. For a healthier twist, swap out 1 cup of the bread flour for whole wheat flour. If dill isn’t your favorite, parsley or chives can provide a lovely alternative. No avocado or olive oil? Try sunflower oil for a neutral flavor.
Preserving Pampushky for Later Enjoyment
To keep your Pampushky fresh, store them in an airtight container at room temperature for up to three days. If you plan to enjoy them beyond that, freezing is your best bet. Simply wrap them tightly in plastic wrap or foil, place them in a freezer bag, and they’ll last for up to three months. Thaw on the counter and reheat in the oven for that fresh-baked feel.
Perfect Pairings for Pampushky
Pampushky pair beautifully with hearty soups or stews, such as borscht or chicken broth, enhancing the meal’s richness. For a fresh contrast, serve them alongside a crisp salad dressed with vinaigrette. As for drinks, a glass of chilled white wine or a refreshing lemonade complements the garlicky goodness splendidly.
Cooking Hacks to Elevate Pampushky
For a fluffier texture, ensure all ingredients are at room temperature before mixing. When kneading the dough, resist the urge to add extra flour to maintain softness. To intensify the garlic flavor, let the garlic mixture sit for 10 minutes before brushing it on the warm rolls. For a crispy crust, bake the rolls on a preheated baking stone.
Adding a Seasonal Spin to Pampushky
In the spring, add a handful of chopped fresh herbs like chervil or tarragon for a vibrant twist. Summer’s bounty might inspire you to incorporate roasted garlic instead of fresh. Warm up winter by adding a pinch of chili flakes to the garlic mixture for a hint of heat, or try rosemary and thyme for an autumnal flavor boost.
 FAQs:
FAQs:
Can I use instant yeast instead of active dry yeast?
Yes, you can use instant yeast in place of active dry yeast. The key difference is that instant yeast doesn’t need to be dissolved in liquid beforehand. You can mix it directly with the dry ingredients. However, since it has a quicker rise time, keep an eye on your dough, as it might be ready sooner than expected.
Can I make Pampushky dough in advance?
Absolutely, you can prepare the dough ahead of time. After kneading, let it rise, then punch it down and store it in the fridge overnight. Allow it to come to room temperature before shaping and letting it rise again. This overnight rest can even enhance the flavor, making your Pampushky even more delicious.
What if I don’t have fresh dill?
If fresh dill isn’t available, you can use dried dill, but remember to use about a third of the amount since dried herbs are more concentrated. Alternatively, try using parsley, chives, or even a mix of Italian herbs to infuse a different aroma and taste into your Pampushky.
How do I know when the dough has risen enough?
A good rule of thumb is to let the dough rise until it has doubled in size. To test, gently press your fingertip into the dough; if the indentation remains, the dough has risen sufficiently. If it springs back quickly, it needs more time. Just be patient and let the yeast work its magic.
Can I freeze the dough before baking?
Yes, you can freeze the dough after the first rise. Shape it into balls and place them on a baking sheet to freeze individually. Once frozen, transfer them to a freezer bag. When ready to bake, let them thaw and rise on a greased baking sheet until doubled in size, and then proceed with the recipe.
Is there a way to make Pampushky gluten-free?
To make Pampushky gluten-free, you’ll need to use a gluten-free bread flour blend. Keep in mind that gluten-free doughs behave differently, often being stickier and more difficult to handle. You might also need to adjust the amount of liquid and kneading time to achieve the right consistency and texture.

Ukrainian Garlic Bread - Pampushky
Ingredients
Dough:
- 2 1/4 cups lukewarm milk
- 3 teaspoons sugar
- 1 tablespoon active dry yeast
- 2 large eggs
- 5 tablespoons olive or avocado oil
- 7 cups bread flour
- 1/2 tablespoon salt
- 1 egg for brushing
- 1 tablespoon water for brushing
Garlic Topping:
- 1/4 cup olive or avocado oil
- 5 cloves minced garlic
- 1 tablespoon coarse sea salt
- 5 tablespoons fresh dill chopped
Instructions
For Dough:
- In a large bowl, combine the lukewarm milk, sugar, and active dry yeast. Cover the bowl with a cloth and let it rest for around 10 minutes.
- Afterwards, incorporate the eggs and oil, mixing well until the mixture is smooth.
- In a separate bowl, blend the salt and bread flour. Gradually mix this dry combination into the wet ingredients, kneading by hand or using a mixer until a smooth, elastic dough forms. Cover and allow it to rise for about an hour.
- Once the dough has risen, lubricate a baking pan with oil. Portion the dough into 24 equal pieces and shape them into balls. Arrange these on the pan, ensuring they're spaced about one inch apart.
- Cover the shaped dough with a cloth and let them rise again for approximately 30 minutes, until they double in volume. Meanwhile, preheat the oven to 350°F.
For Garlic Topping:
- In a small bowl, whisk together the egg and water. Brush this mixture over the tops of the dough balls. Bake them for about 30 minutes, or until they achieve a golden-brown color.
- While the bread is baking, mix the olive oil, minced garlic, dill, and coarse sea salt in another bowl.
- Once the pampushky are finished baking, brush the warm rolls with the garlic mixture. Serve immediately while warm and enjoy!