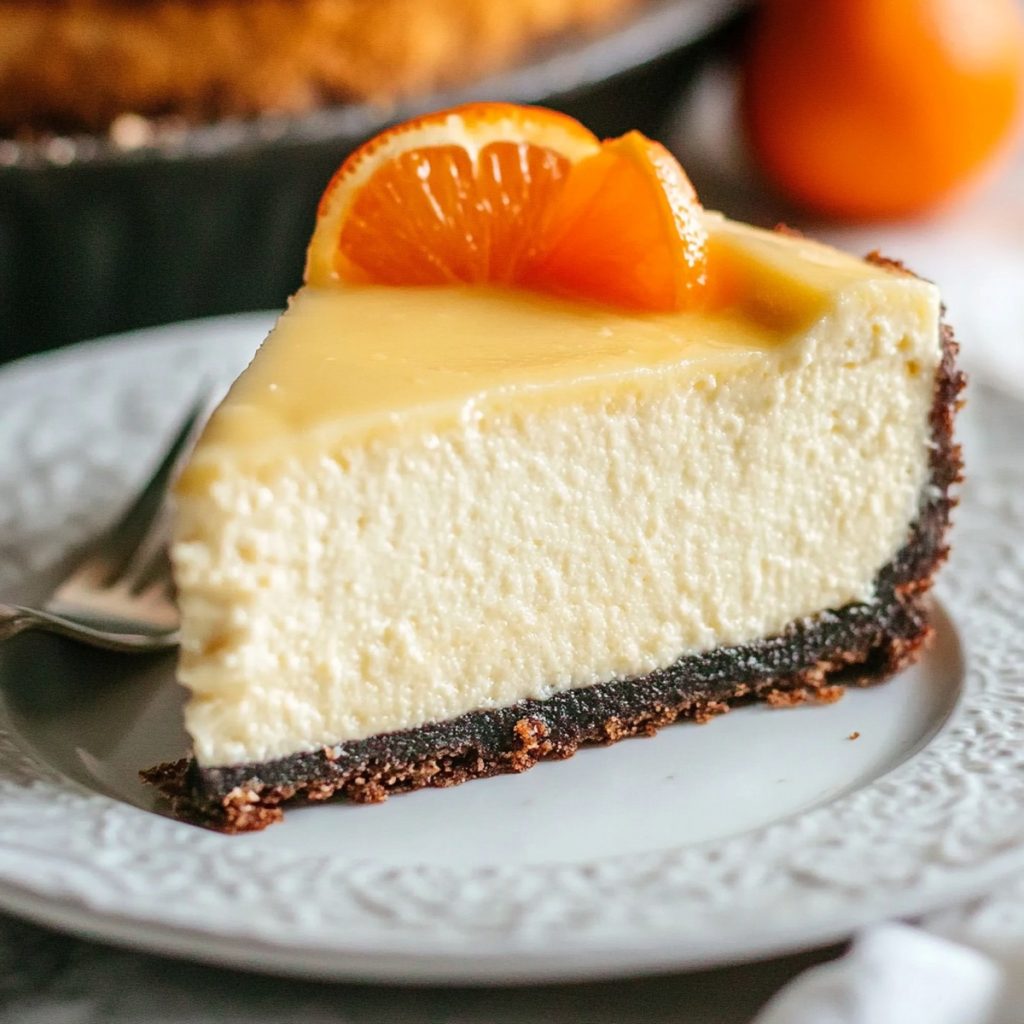
I made this Clementine Vanilla Bean Cheesecake for a holiday potluck where I absolutely did not have time for fussy baking, but still needed something that felt special. I love citrus desserts, but I kept running into lemon or plain vanilla recipes. Clementines were on sale, I had vanilla bean paste in the pantry, and a half-full package of chocolate wafers staring at me. This cheesecake basically built itself from what I already had.
What surprised me is how doable it was on a weeknight, broken into simple steps. The base uses straightforward ingredients, and once you understand why the water bath and gentle mixing matter, it becomes a low-effort, high-payoff dessert. It chills overnight, so it’s ideal when you want to make something ahead for a brunch, birthday, or holiday dinner without scrambling at the last minute.
The clementine zest keeps it bright and not too heavy, the vanilla bean makes it feel bakery-level, and the chocolate cookie crust just makes everyone happy. I’ve tweaked the method a bit to minimize cracking, cut down on mess, and use tools most of us already own. If you’re juggling work, kids, or just a packed schedule, this Clementine Vanilla Bean Cheesecake is the kind of “showpiece” you can actually pull off without stress.
Clementine Vanilla Bean Cheesecake, Made Easy
Click here to get printable version
Clean, Wholesome Ingredients
- 2 cups finely crushed chocolate wafers
- 4 tablespoons unsalted butter, melted
- 4 (8-oz) packages full-fat cream cheese, at room temperature
- 1¼ cups granulated sugar
- 2 tablespoons cornstarch
- ½ teaspoon kosher salt
- ¾ cup full-fat sour cream
- Zest of 4 clementines (about 2 tablespoons)
- Juice of 1 clementine (about 2 tablespoons)
- 2 teaspoons vanilla bean paste (or vanilla extract)
- 3 large eggs, at room temperature
- 1 large egg yolk, at room temperature
- Dehydrated orange slices (optional, for decoration)
- Whipped cream, for serving
Start Here
- Preheat your oven to 350°F. Set out all cold ingredients so they can fully come to room temperature while you prep the crust — this helps everything blend smoothly.
- Add about 30 chocolate wafers to a food processor and pulse until you get fine, even crumbs. You don’t want large chunks; it should look like coarse sand.
- With the machine running, slowly pour in the melted butter. Process just until the crumbs are evenly moistened and start to clump slightly. The texture should feel like wet sand that holds together when pressed.
- Generously spray a 9-inch springform pan with nonstick spray on the bottom and sides. Line the bottom with a round of parchment and the sides with a long strip. Lightly spray the parchment as well so the cheesecake releases easily later.
- Tip the crumb mixture into the pan and press it firmly into an even layer across the bottom and slightly up the sides. Use the bottom of a measuring cup to pack it tightly so it doesn’t crumble when sliced.
- Bake the crust for 10 minutes. Set it aside to cool while you make the filling. Lower the oven temperature to 325°F after the crust comes out.
- Set a kettle or pot of water over high heat and bring it to a boil. You’ll use this for the water bath that keeps the cheesecake creamy.
- In a stand mixer bowl (or large mixing bowl with a hand mixer), add the cream cheese. Beat on medium speed until completely smooth and creamy, with no lumps. Don’t rush this step — fully soft, smooth cream cheese is key for a silky filling.
- Turn off the mixer and use a spatula to stir and press the cream cheese around the bowl, knocking out any big air pockets. This quick stir helps prevent cracking later.
- Add the sugar, cornstarch, salt, sour cream, clementine zest and juice, and vanilla bean paste. Beat on low–medium speed just until everything is fully combined and smooth. Scrape down the sides and bottom, then stir again by hand to release extra air.
- Add the eggs and egg yolk one at a time, mixing on low speed after each addition until just incorporated. Stop mixing as soon as the streaks of egg disappear — overbeating here can whip in too much air.
- Give the batter a final gentle stir with your spatula, scraping the sides and bottom and smoothing out any bubbles.
- Place a large baking dish on the bottom rack of your 325°F oven. Carefully pour in the boiling water until it’s a few inches deep, then close the oven door to trap the steam.
- Pour the cheesecake batter into the cooled crust. Smooth the top with an offset spatula or the back of a spoon. Tap the pan gently on the counter a few times to pop visible air bubbles.
- Set the springform pan on the middle rack, directly above the water-filled baking dish. Close the oven door promptly so the steamy environment stays stable.
- Bake for about 1 hour 15 minutes. The cheesecake is done when the edges look set and slightly puffed, and the center has a soft wobble when you gently shake the pan. Start checking around 1 hour; if needed, continue baking in 15-minute increments.
- Turn the oven off and crack the door open slightly. Leave the cheesecake inside for 1 hour. This slow cooling step helps prevent dramatic temperature changes that cause cracks.
- After 1 hour, remove the cheesecake from the oven and cool it completely at room temperature. Don’t cover it while it’s still warm to avoid condensation droplets on top.
- Once fully cool, cover the pan and refrigerate the cheesecake for at least 4 hours, but ideally overnight. The texture firms up and the flavors deepen during this time.
- When ready to serve, release the springform collar slowly and peel away the parchment from the sides. Transfer to a serving plate if you like.
- Pipe or spoon whipped cream on top and decorate with dehydrated orange slices, if using. Slice with a very sharp knife, wiping the blade clean between cuts for neat slices.
- To make dehydrated orange slices: Preheat the oven to 200°F and line a large baking sheet with parchment. Slice one medium orange into thin rounds and arrange them in a single layer. Bake for 2–3 hours, flipping once, until mostly dry and crisp at the edges. They’ll crisp further as they cool.
Why the water bath and all that stirring actually matter for this cheesecake
It’s tempting to skip the water bath or rush the mixing, especially when you’re short on time, but those two details are what keep this Clementine Vanilla Bean Cheesecake ultra-creamy instead of dense or cracked. The pan never sits directly in the water, but that dish of hot water underneath creates a humid oven environment. The moisture slows down how quickly the top dries out, so the cheesecake can set evenly from edge to center. Less drastic temperature difference means fewer cracks. Thorough but gentle stirring is the other half of the equation. Creaming the cheese until completely smooth at the beginning breaks up any lumps. After that, mixing on low and finishing with a spatula helps you avoid whipping in excess air. Less air equals a tighter, silkier texture and a flat, even surface that looks bakery-made, with almost no extra effort.
Clementines, vanilla bean, and that chocolate crust: swaps that work (and ones that don’t)
If you don’t have clementines, you can swap in regular oranges or tangerines. Just keep the amounts the same and taste the zest — if it’s very strong, you may want slightly less. Lemon works too, but the flavor will be sharper and less sweet. For vanilla, vanilla bean paste gives the prettiest specks and deepest flavor, but high-quality vanilla extract is totally fine. On the crust, chocolate wafers can be swapped with chocolate graham crackers or chocolate sandwich cookies (scrape out the filling first for a less sweet base). What doesn’t work as well is a very soft or oily cookie, which can turn greasy, or strongly spiced cookies that compete with the citrus and vanilla. If you want to keep it simple, stick close to a neutral chocolate cookie and you’ll get that same crowd-pleasing balance.
FAQ: All You Need to Know
Can I bake this cheesecake without a springform pan?
You can, but you’ll want to adjust your expectations slightly. A 9-inch deep cake pan works as a backup; just line the bottom and sides with parchment, leaving an overhang so you can lift the cheesecake out after chilling. Grease everything very well to prevent sticking. The main trade-off is presentation — it’s a little harder to get perfectly clean sides. You also won’t want to flip it out like a regular cake, so plan on lifting gently or serving directly from the pan. Baking time stays similar, but start checking a bit earlier since metal thickness varies.
How far in advance can I make this cheesecake and how should I store it?
This Clementine Vanilla Bean Cheesecake is great for planning ahead. You can bake it up to 2 days before serving. After it has cooled to room temperature, cover the pan tightly with plastic wrap or foil and keep it in the fridge. Wait to add whipped cream and decorations until the day you serve, so they stay fresh. Leftovers will keep well for about 4–5 days in the refrigerator. For longer storage, you can freeze individual slices wrapped tightly in plastic and then in foil for up to 1 month. Thaw overnight in the fridge before serving.
What if my cheesecake cracks on top anyway — is it ruined?
Not at all. Even when you do everything “right,” ovens and room temperatures differ, and a crack can still happen. The good news is that it doesn’t affect the flavor or creamy texture. If you see a crack forming, don’t panic. Let the cheesecake complete baking as directed, and follow the slow-cooling steps. Once it’s chilled, you can easily cover cracks with a layer of whipped cream, citrus slices, or even a thin sour cream topping. The key thing is that the center is fully set but still soft; a cosmetic crack is purely a visual issue and totally fixable for serving.

Clementine Vanilla Bean Cheesecake
Equipment
- 9-inch springform pan
- food processor
- stand mixer or hand mixer
- large baking dish (for water bath)
- kettle or pot for boiling water
- mixing bowls and spatula
Ingredients
Crust:
- 2 cups finely crushed chocolate wafers
- 4 tablespoons unsalted butter melted
Filling:
- 4 8-oz packages full-fat cream cheese at room temperature
- 1¼ cups granulated sugar
- 2 tablespoons cornstarch
- 1/2 teaspoon kosher salt
- 3/4 cup full-fat sour cream
- 2 tablespoons clementine zest from about 4 clementines
- 2 tablespoons clementine juice juice of about 1 clementine
- 2 teaspoons vanilla bean paste or vanilla extract
- 3 large eggs at room temperature
- 1 large egg yolk at room temperature
Decoration:
- dehydrated orange slices optional; see recipe below
- whipped cream for topping
Instructions
- Gather all ingredients and equipment before beginning.
For the Crust:
- Preheat the oven to 350°F. Place about 30 chocolate wafers in a food processor and pulse until they form fine crumbs.
- With the processor running, slowly pour in the melted butter until the crumbs are evenly moistened and begin to clump.
- Prepare a 9-inch springform pan by spraying the bottom and sides, lining the bottom with a round piece of parchment and a strip around the sides, then spraying the parchment.
- Press the crumb mixture firmly into the bottom and slightly up the sides of the pan to form an even crust. Bake 10 minutes, then remove and let cool while you prepare the filling.
For the Filling:
- Lower the oven temperature to 325°F and bring a kettle or pot of water to a boil for the water bath you'll use later.
- In a stand mixer fitted with the paddle (or using a hand mixer), beat the room-temperature cream cheese until fully smooth and free of lumps for a silky base.
- Stir the mixture gently with a spatula to release any trapped air; reducing air helps prevent cracks while baking.
- Add the granulated sugar, cornstarch, kosher salt, sour cream, clementine zest and juice, and vanilla bean paste. Beat until the mixture is smooth, scraping down the sides to ensure even mixing and to remove air pockets.
- Add the eggs and the extra yolk one at a time, mixing briefly after each addition until the filling is homogeneous and creamy.
- Use a spatula to stir the batter a few times to free any remaining air. Pour the filling into the cooled crust and smooth the top; gently tap the pan on the counter to release bubbles.
Baking and Cooling:
- Place a large baking dish on the bottom rack of the oven and set the cheesecake on the middle rack. Carefully pour the boiling water into the baking dish to create a water bath, then close the oven door quickly to retain moisture.
- Bake for about 1 hour and 15 minutes, or until the edges are set and the center still has a slight wobble when gently shaken. Start checking at 1 hour and continue in 15-minute increments if needed.
- Turn off the oven and crack the door open; allow the cheesecake to remain in the oven for 1 hour to cool slowly.
- Remove the cheesecake and cool to room temperature on a rack, then refrigerate for a minimum of 4 hours (overnight is best) to fully set.
- When chilled, carefully remove the springform collar and peel away any parchment. Top with dollops of whipped cream and optional dehydrated orange slices for decoration.
- Use a very sharp knife to slice and serve chilled.
Dehydrated Orange Slices (optional):
- Preheat the oven to 200°F and line a large baking sheet with parchment. Thinly slice one medium orange and arrange the rounds in a single layer on the sheet.
- Bake the orange slices for 2 to 3 hours until they are dehydrated and crisp; they will continue to crisp as they cool. Let cool completely before using as a garnish.