When I first started making cheesy baked chicken tacos, it was mostly out of self-preservation on chaotic weeknights. I needed something that didn’t require a ton of hands-on time, worked for picky and adventurous eaters at the same table, and still felt like a real meal. These tacos did all of that right away, and they’ve stuck around in my rotation ever since.
There’s a lot to like here if you’re cooking for family or friends. You get the structure and crunch of a hard shell, the softness of refried beans, and a cheesy, saucy chicken filling that doesn’t fall out the second someone takes a bite. Because everything bakes together, the flavors have a chance to settle in, and the cheese melts into all the gaps. It’s straightforward comfort food, but still feels put-together enough to serve to guests.
I reach for this recipe when I want something that’s easy to scale. You can set up a tray or two of tacos, slide them into the oven, and spend that time dealing with sides, cleaning up, or getting the table ready. Once they’re baked, it’s basically a self-serve situation: pan of tacos in the middle, a few bowls of toppings around it, and people can build their plate the way they like.
If you entertain often, this is the kind of dish that’s useful to have in your back pocket. You can use rotisserie chicken to cut down on prep, or cook and shred chicken yourself if you prefer. The ingredients are familiar and easy to find, but the method—baking the tacos already filled—makes them feel a bit more special. It’s the same idea that works for game days, casual Friday dinners, or feeding a mixed crowd where you need something reliable that doesn’t create extra work.
A Taste of Inspiration: How to Make Cheesy Baked Chicken Tacos
Click here to get printable version
Your Ingredient List
- 10 Old El Paso Stand ‘N Stuff taco shells
- 1/2 medium yellow onion, diced
- 2 1/2 cups shredded rotisserie or cooked chicken (about 1 lb.)
- 1 (1 oz.) packet taco seasoning
- Water, as called for on the taco seasoning packet
- 1 (10 oz.) can Rotel diced tomatoes, fully drained
- 8 oz. refried beans
- 1 (8 oz.) package Mexican cheese blend, shredded
- Oil, for sautéing the onion
Steps to Savor
- Preheat your oven to 400°F (200°C). Set out a 9×13-inch casserole dish or a rimmed baking sheet. Stand the taco shells upright in the dish or on the tray so they’re ready to fill. Prepping the shells first makes the assembly go much faster.
- Heat a drizzle of oil in a skillet over medium-high heat. Add the diced onion and sauté for about 1 minute, stirring often, until it softens and smells fragrant. Don’t brown it deeply; you just want the bite taken out of the raw onion.
- Add the shredded chicken to the skillet with the onions. Sprinkle in the taco seasoning and pour in the water according to the packet directions. Stir well to coat all the chicken.
- Let the chicken mixture simmer, stirring occasionally, until most of the liquid has evaporated and the chicken is heated through. The mixture should look moist but not saucy; you don’t want extra liquid soaking into the shells.
- Stir in the drained Rotel tomatoes. Keep cooking for another 2–3 minutes, until any remaining juices from the tomatoes have mostly cooked off and the mixture has thickened slightly. Turn off the heat. The filling should hold together when spooned.
- Spread a thin, even layer of refried beans in the bottom of each taco shell. Using a spoon or small scoop, divide the chicken mixture over the beans in each shell, packing it in gently so it stays put.
- Top each taco generously with the shredded Mexican cheese blend. Make sure some cheese hits the edges where it meets the shell; this helps everything “glue” together a bit as it bakes.
- Transfer the pan of filled tacos to the oven. Bake for 5–7 minutes, or until the cheese is fully melted and the taco shells are hot and crisp. Check around the 5-minute mark so the shells don’t over-brown.
- Remove from the oven and let the tacos sit for 2–3 minutes so the filling settles slightly. Serve hot with your favorite toppings like sour cream, shredded lettuce, salsa, or sliced jalapeños.
Why Baked Chicken Tacos Work
These cheesy baked chicken tacos work so well because they solve a few common taco problems at once. Baking the tacos already assembled means the shells stay upright, the cheese fully melts, and the filling has a chance to bind together a bit. That gives you a taco that’s easier to pick up and won’t lose half its contents on the plate after one bite. The layer of refried beans at the bottom acts like an anchor, keeping the chicken mixture in place while also adding richness and extra protein. Using stand-and-stuff shells keeps things tidy and predictable when you’re serving a group. And because everything finishes in the oven, you can prep ahead, slide a full pan in to bake, and serve everyone hot tacos at the same time instead of assembling them to order at the stove.
Smart Shortcuts Using Rotisserie Chicken
Rotisserie chicken makes this recipe even more practical, especially if you’re cooking for guests. The meat is already cooked and seasoned, so all you need to do is shred it and warm it through with the taco seasoning and tomatoes. Shred the chicken into small, bite-sized pieces so it mixes well with the seasoning and fits neatly into the shells. If you’re short on time, you can shred the chicken the day before and refrigerate it, then pull it out when you’re ready to cook. Using both white and dark meat gives better texture and flavor. For a big gathering, buy one or two extra chickens, shred everything at once, and freeze portions of seasoned filling for future taco nights.
Pro Tips for Perfect Crispy Shells
Getting crisp shells without burnt edges comes down to moisture control and oven time. Make sure the Rotel tomatoes are fully drained before they go into the pan, and cook the filling until it’s thick and not watery. Any extra liquid will soften the shells as they bake. When you spread the refried beans, keep the layer thin; too much can weigh the shells down and make them soggy. Position the taco shells snugly in the baking dish so they support each other and stand upright. Bake on the middle rack for even heat, and start checking at 5 minutes because different ovens brown at different speeds. If you like extra crunch, you can pre-bake the empty shells for 3–4 minutes before filling, just watch them closely so they don’t darken too much.
Topping Ideas Kids (and Adults) Love
One of the easiest ways to keep everyone happy is to treat these cheesy baked chicken tacos like the base of a small topping bar. For kids, simple options like shredded lettuce, mild salsa, sour cream, and extra shredded cheese usually go over well. Adults often appreciate a bit more texture and heat, so you can add sliced jalapeños, pickled onions, fresh cilantro, avocado slices, or a squeeze of lime. To keep things organized for a crowd, use small bowls or ramekins and group mild toppings together and spicy ones together. Always serve toppings cold or at room temperature so they contrast nicely with the hot tacos. This setup also makes it easier for guests with dietary preferences to customize their plates without extra work from you.
Make-Ahead, Freezer, and Reheat Tips
For busy days or entertaining, you can prep most of this recipe ahead. The chicken filling can be cooked up to 2 days in advance and stored in the fridge, tightly covered. When you’re ready to assemble, gently rewarm it in a skillet with a splash of water so it loosens up. For freezing, cool the chicken mixture completely, portion it into airtight containers or freezer bags, and freeze for up to 3 months. Don’t freeze the tacos already assembled in shells; the shells will soften and crumble as they thaw. Instead, freeze just the filling. To reheat leftover baked tacos, use the oven or an air fryer at 350°F until hot and crispy again, about 8–10 minutes. The microwave will warm them but can soften the shells, so reserve that option for quick single servings when texture matters less.
Common Questions Answered
How can I keep the tacos hot if I’m serving a crowd over a longer period?
If you’re hosting and people are eating in waves, the goal is to keep the tacos warm without overcooking or drying them out. Once baked, transfer the tacos to an oven-safe serving dish and keep them in the oven on the lowest setting, usually around 200°F. Leave the dish uncovered so steam doesn’t build up and soften the shells. Rotate the pan occasionally for even warmth. Another option is to bake smaller batches as needed: assemble all the shells ahead, keep them at room temperature, and then bake one tray while the previous tray is being eaten.
Can I use soft tortillas instead of hard taco shells for this baked method?
You can adapt this recipe to soft tortillas, but a few adjustments help them hold up. Use small flour tortillas, brush or spray both sides lightly with oil, and press them into a muffin tin or a taco rack so they keep their shape. Pre-bake the oiled tortillas for 4–5 minutes to firm them up before filling. Then add a thinner layer of beans and chicken so they don’t tear. Bake again just until the cheese melts. They’ll be softer than hard shells, but you’ll still get nice edges and a structure that’s easy to pick up.
What can I do if my filling tastes bland even after using taco seasoning?
If the filling tastes flat, it usually needs a combination of acid, salt, and sometimes fat. After the chicken mixture has thickened, taste it in the pan. If it’s dull, add a pinch of salt at a time, then a squeeze of lime juice or a splash of vinegar to brighten it. Always season while the filling is still warm; flavors blend better that way. A small spoonful of tomato paste or a bit of hot sauce can deepen the flavor too. Just avoid adding extra liquid at the end, or cook it down again briefly so the tacos don’t turn soggy.

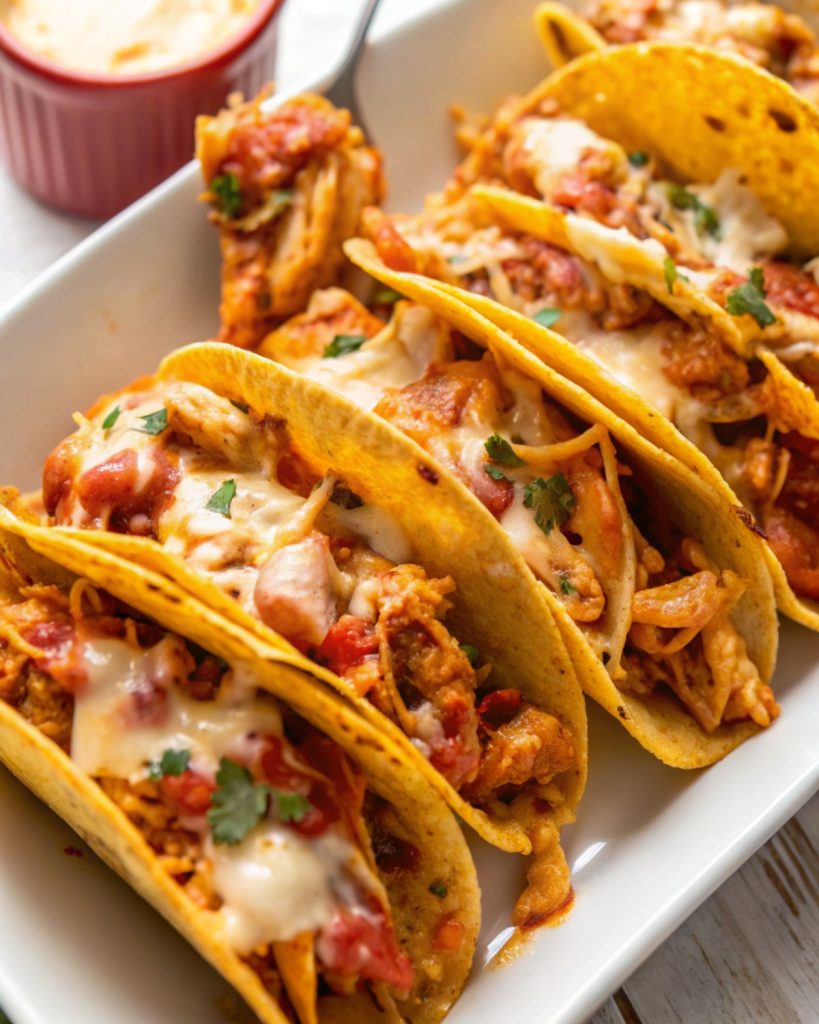
Cheesy Baked Chicken Tacos
Equipment
- Skillet
- Casserole dish or baking sheet
Ingredients
- 10 count Old El Paso Stand 'N Stuff taco shells
- 1/2 medium yellow onion diced
- 2 1/2 cups rotisserie or cooked chicken shredded (about 1 lb.)
- 1 1 oz packet taco seasoning
- 1 10 ounce can Rotel diced tomatoes fully drained
- 1 8 ounce can refried beans
- 1 8 ounce package Mexican cheese blend
Instructions
- Preheat your oven to 400°F (200°C). Stand the taco shells upright in a casserole dish or arrange them on a baking sheet so they will hold their fillings.
- Warm a drizzle of oil in a skillet over medium-high heat. Add the diced onion and cook until it softens, about one minute.
- Stir in the shredded chicken and the taco seasoning along with the amount of water called for on the seasoning packet. Reduce the heat and simmer until the liquid mostly evaporates and the chicken is heated through.
- Fold the drained Rotel tomatoes into the chicken, then continue to simmer until the mixture thickens and excess tomato juices have reduced.
- Spoon a layer of refried beans into the bottom of each taco shell, top with the chicken mixture, and finish by sprinkling with the Mexican cheese blend.
- Bake the filled shells at 400°F for 5–7 minutes, until the cheese has melted and is bubbly.
- Remove from the oven and serve right away with your favorite toppings such as sour cream, salsa, cilantro, or avocado.