Think others will like this? Share it!
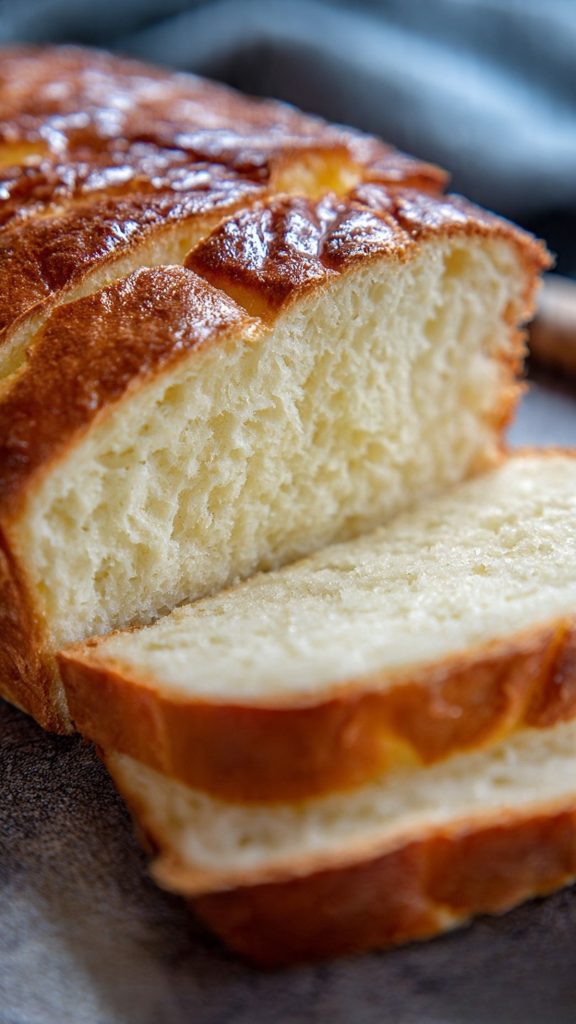
When I first saw yogurt bread in a small café in Greece, I was more interested in the technique than the taste. Two ingredients, no yeast, no kneading, and still a proper loaf? That kind of recipe is perfect for travel days, tight budgets, and small kitchens. Once I understood the method, it became a go-to whenever I needed fresh bread without planning ahead.
The real trick with yogurt bread isn’t fancy equipment or special skills. It’s how you handle the dough from the moment the yogurt meets the flour. Stir too aggressively and you’ll end up with a dense, rubbery loaf. Mix just enough, treat it more like a quick bread batter, and you get a soft crumb and surprisingly good rise. Knowing when to stop mixing is the small detail that changes everything.
This recipe is especially useful if you’re watching costs or cooking in a rental kitchen abroad. Self-rising flour and vanilla yogurt are easy to find in most supermarkets, and you don’t need eggs, oil, or sugar. It’s a straightforward way to put warm bread on the table with almost no waste: two pantry items, one bowl, one pan. Once you’ve mastered the texture you’re aiming for, you can adapt it to whatever you have on hand—spices, citrus zest, even leftover jam—without buying a long list of extras.
The Magic of Yogurt Bread
Click here to get printable version
Gathering Your Ingredients
- 3 cups self-rising flour
- 1¾ cups low fat vanilla yogurt (regular style, not Greek)
Steps to Savor
- Preheat your oven to 375℉ (190℃). Line an 8×4-inch loaf pan with parchment paper, letting some overhang for easy lifting. This prevents sticking and makes it easier to remove the bread without tearing.
- Sift the self-rising flour into a large mixing bowl. Sifting helps avoid lumps and gives the bread a more even texture. Add the vanilla yogurt directly to the flour.
- Using a silicone spatula or wooden spoon, gently fold the yogurt into the flour until no dry patches remain. The mixture will be thick and slightly sticky, more like a heavy batter than a kneadable dough. Stop mixing as soon as everything is just combined to keep the loaf soft.
- Scrape the batter into the prepared loaf pan. Use the spatula to spread it into the corners and smooth the top so it’s mostly even. An even surface helps it bake uniformly and prevents one side from rising more than the other.
- Place the pan on the middle rack and bake for 35–40 minutes. Check around the 20-minute mark: if the top is browning too quickly, loosely cover the loaf with a piece of foil or parchment to protect it while the center finishes cooking.
- The bread is done when the top is deep golden, it feels firm to the touch, and a toothpick inserted in the center comes out clean or with just a few moist crumbs. Avoid overbaking, as that can dry out the loaf.
- Remove the pan from the oven and let the bread sit for about 5 minutes. This short rest helps it set and makes it less fragile.
- Use the parchment overhang to lift the bread from the pan and transfer it to a wire rack. Let it cool completely before slicing. Cutting while it’s too hot can make the crumb gummy or compressed, so give it time to firm up.
Self-Rising Flour Swap
If you don’t have self-rising flour where you live or you’re traveling and only find all-purpose flour, you can easily make your own version. For this recipe, combine 3 cups of all-purpose flour with 4½ teaspoons of baking powder and ¾ teaspoon of salt. Whisk very well so the leavening is evenly distributed. Don’t skip the whisking step; uneven mixing can cause random tall pockets and dense spots in the loaf.
Homemade self-rising flour is a smart way to avoid buying another bag of specialty flour that might sit unused. It also lets you adjust the salt slightly if you need to watch your sodium. If you’re baking at a higher altitude, you can reduce the baking powder slightly to avoid over-rising and collapsing. Mix the blend just before using rather than storing large batches when you’re in a temporary kitchen, so you keep things simple and avoid waste.
Best Yogurt to Use
This bread depends heavily on the yogurt you choose, so it’s worth getting it right. The recipe is designed for regular low fat vanilla yogurt, not Greek-style yogurt. Greek yogurt is too thick and concentrated; it doesn’t provide enough moisture, and the loaf can turn out dry and dense. Regular yogurt gives the batter the looser consistency it needs for a good rise and soft crumb.
If you only find plain yogurt while traveling, you can still make this work. Use the same amount of plain yogurt and add 1–2 teaspoons of sugar and a small splash of vanilla extract to mimic vanilla yogurt. Aim for a yogurt that isn’t labeled “non-dairy” or “drinkable,” as those can have very different textures. The key is a spoonable yogurt with a medium thickness—not watery, not strained. If it seems very runny, reduce it by a tablespoon or two so the batter doesn’t become too loose.
Answers to Popular Questions
How can I tell if I’ve overmixed the yogurt bread batter, and can I fix it?
With this bread, overmixing is one of the easiest ways to ruin the texture. If the batter becomes very smooth, stretchy, and heavy, you’ve likely stirred too long and developed too much gluten. You can’t fully reverse that, but you can prevent making it worse. Stop mixing immediately once you suspect overmixing, gently scrape the batter into the pan, and avoid pressing it down too firmly. The loaf may be denser, but it will still be usable for toast or croutons.
Why does my yogurt bread seem undercooked in the center even when the top is dark?
This usually means the oven runs hot or the loaf pan conducts heat strongly. The outside sets before the middle finishes. To prevent this, place the pan on the middle rack and check doneness with a toothpick or thin knife, not just by color. If the top browns early, cover it loosely with foil and continue baking until the tester comes out mostly clean. Also, avoid cutting the loaf while it’s warm; letting it cool fully helps the center firm up and finish setting.

Yogurt Bread
Equipment
- 8x4-inch loaf pan
- parchment paper
- Large mixing bowl
- Silicone spatula
- Wire cooling rack
Ingredients
Yogurt Bread:
- 3 cups self-rising flour
- 1 3/4 cups low-fat vanilla yogurt use regular vanilla yogurt (not Greek)
If making homemade self-rising flour:
- 3 cups all-purpose flour
- 4 1/2 teaspoons baking powder
- 3/4 teaspoon salt
Instructions
- Preheat the oven to 375°F (190°C). Line an 8x4-inch loaf pan with parchment paper so the loaf is easy to lift out after baking.
Make the Batter:
- Sift the self-rising flour into a large bowl to aerate and remove lumps.
- Add the vanilla yogurt to the flour and fold together with a silicone spatula until the mixture is fully combined and forms a cohesive batter.
- Spoon the batter into the prepared pan and smooth the top with the spatula so it’s mostly level.
Bake & Cool:
- Bake the loaf for 35 to 40 minutes, or until a toothpick inserted in the center comes out clean. If the crust starts to brown too quickly, loosely tent the pan with foil halfway through baking.
- Remove the pan from the oven and let the loaf rest for about 5 minutes. Then lift it from the pan using the parchment and transfer to a wire rack to cool completely before slicing.
If making homemade self-rising flour:
- Combine 3 cups all-purpose flour, 4½ teaspoons baking powder, and ¾ teaspoon salt; whisk or sift together until evenly distributed, then use in place of self-rising flour in the recipe.
Notes:
- Use regular vanilla yogurt for best texture—Greek yogurt will produce a denser loaf and is not recommended.